Sony did not add the Xperia L in the list of Xperia smartphones which will get Android 5.0 Lollipop upgrade when it becomes available. Although the smartphone will not receive official firmware from Sony, it can still be updated to the latest Android version via custom builds.
Recognised XDA developer, varun.chitre15 has released an AOSP build of Android 5.0 for the Xperia L, which is currently in the alpha version and is expected to have bugs. Here is a list of working and non-working features in this build.
Working:
- Display
- Touchscreen
- Hardware Acceleration
- System audio
- Hardware Media Decoding/Playback - Audio and Video
- All sensors - Auto brightness, magnetic, accelerometer etc
- Headset
- Vibrator
- Camera - Front and Back
- GPU Rendering
- Internal Storage
- External Storage
- LEDs
Not working:
- Wi-Fi
- Bluetooth
- RIL and GPS
If you want to give the alpha version of the AOSP ROM a try, head over to the installation guide below.
Key points
- Before following the installation guide, ensure that you have backed up all important data of the phone. This procedure will completely wipe out the internal storage of the device.
- The bootloader of Xperia L should be unlocked.
- The phone should have above 80% charge.
- Check the model number of Xperia L and install custom firmware accordingly. Flashing this in an incorrect variant might brick the device.
- Rooting the device to install custom ROM will void the warranty of the Android device.
- IBTimes UK will not be responsible for any damage to the device.
- Download files
- Android 5.0 AOSP ROM [File name: c2105_alpha1_android-5.0.0_r2_fastboot.zip]
Fastboot and ADB files [File name: adb_and_fastboot_files.zip]
Fastboot and ADB files [File name: adb_and_fastboot_files.zip]
How to install Android 5.0 AOSP ROM on Sony Xperia L
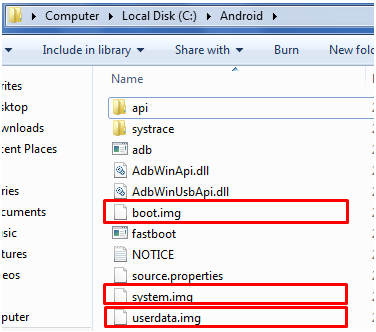
Step-1: Extract c2105_alpha1_android-5.0.0_r2_fastboot.zip in a folder on your PC to get the following files
Step-3: Copy the files which you have got in step-1 to the ADB and Fastboot folder
Step-4: Do the following to boot Xperia L into Fastboot mode
Step-6: Type in the following commands in an orderly manner to install Android 5.0 on Xperia L. This step might take some time
Step-1: Extract c2105_alpha1_android-5.0.0_r2_fastboot.zip in a folder on your PC to get the following files
- boot.img
- system.img
- userdat.img
Step-3: Copy the files which you have got in step-1 to the ADB and Fastboot folder
Step-4: Do the following to boot Xperia L into Fastboot mode
- Switch off the Xperia L
- Press the Volume Up button
- Connect the phone to the computer using USB cable while holding the Volume Up button
- Note: Before plugging the USB cable on Xperia Z1 ensure that the other end is connected to the computer.
- Xperia L should now be in the Fastboot Mode and the LED light of the phone should turn to blue.
Step-6: Type in the following commands in an orderly manner to install Android 5.0 on Xperia L. This step might take some time
- fastboot flash boot boot.img
- fastboot flash system system.img
- fastboot flash userdata userdata.img
- fastboot reboot
Android 4.4 KitKat Omni Custom ROM for Sony Xperia L (C2104/2105)

Recently, every manufacturer is releasingAndroid 4.4 KitKat updates for their specific Smartphones. It seems that, everyone is tasting the most sweetest Android KitKat version and enjoying it’s amazing features. While, the Sony Xperia L also gets an officialAndroid 4.4 KitKat and users are very much glad to get that most awaited updates. Well, the fun doesn’t end here! If you have rooted your Sony Xperia L then you can installvarious Android 4.4 KitKat Custom ROMs and able to customize your device more efficiently.
Today, for those users, who have rooted their Sony Xperia L; we have brought a first everCustom ROM for Sony Xperia L namely Omni ROM. This Custom ROM is quite well-known which supports a long-list of Android Smartphones and today, one more device is added to the list, i.e., Sony Xperia L. The Omni ROM is based on Android 4.4.1 KitKat and as this is the alpha build, it has some bugs like Bluetooth not working, proximity Sensor remains continuously on, and few more things. So, it’s strongly recommended that you must go with this Omni Custom ROM for Sony Xperia L at your own risk!
Finally, if you’re on the way to install Android 4.4 KitKat Omni Custom ROM for Sony Xperia L then below is the guide about it. It’s advisable that, first you read the whole post carefully and if you find any steps that are difficult to understand then please let us know using the comments section. Well, if you’re an expert then simply jump to the step-by-step guide.
Finally, if you’re on the way to install Android 4.4 KitKat Omni Custom ROM for Sony Xperia L then below is the guide about it. It’s advisable that, first you read the whole post carefully and if you find any steps that are difficult to understand then please let us know using the comments section. Well, if you’re an expert then simply jump to the step-by-step guide.
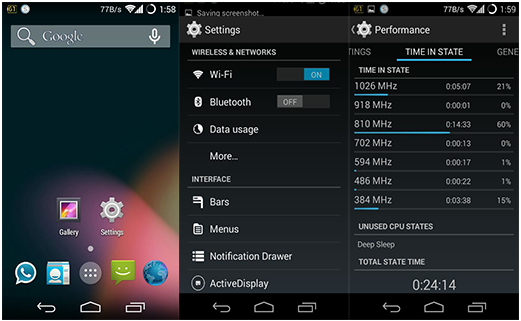
Screenshots:
Requirements:
- Be ready with Computer running on Windows/Linux Operating System, device and Original USB data cable.
- Make sure your Sony Xperia L is rooted and bootloader unlocked.
- ADB and Fastboot Drivers must be installed on your PC.
- Do Enable USB debugging mode (Menu (app drawer) > Settings > Manage Applications > Development > USB Debugging – check box).
- Ensure that you have backed up your all important data.
Download Files:Note: From the above link you have to download “system.img“, “boot.img“, & “userdata.img” and place it into “Fastboot folder” (Example: C:Android).
Steps To Install Android 4.4 KitKat Omni Custom ROM for Sony Xperia LStep 1: First, boot your Sony Xperia L in to bootloader mode.
Step 2: Connect your device with computer using original USB data cable.
Step 3: Now, navigate to the “fastboot folder” and from there open the command prompt. To do so,
fastboot flash system system.img
fastboot flash boot boot.img
fastboot flash userdata userdata.img
fastboot reboot
Step 5: After executing last step, your all data will be deleted and your device will be rebooted automatically. That’s it! You’re done.
Note: Your device will take some more time to boot-up after installing any Custom ROM, so keep patience and wait for the device to be properly configured.
Once you get the screen; it means, you have successfully installed Android 4.4 KitKat OmniCustom ROM for Sony Xperia L. In case, any help needed then do share with us using the below comments section! Enjoy
Step 2: Connect your device with computer using original USB data cable.
Step 3: Now, navigate to the “fastboot folder” and from there open the command prompt. To do so,
- Press and hold “Shift Key” and press “Mouse Right-Click”, sub-menu will opens-up and from there, choose the option “Open command window here“.
fastboot flash system system.img
fastboot flash boot boot.img
fastboot flash userdata userdata.img
fastboot reboot
Step 5: After executing last step, your all data will be deleted and your device will be rebooted automatically. That’s it! You’re done.
Note: Your device will take some more time to boot-up after installing any Custom ROM, so keep patience and wait for the device to be properly configured.
Once you get the screen; it means, you have successfully installed Android 4.4 KitKat OmniCustom ROM for Sony Xperia L. In case, any help needed then do share with us using the below comments section! Enjoy
